

Here is the latest installment from the Nautical Nursery posts; a striped paint banner on the wall above my son's crib. I am really happy with how it turned out, now I just need to choose some letters (wood or vinyl?) to go above his crib. "Captain Jack" is courtesy of Photoshop and not his actual name, just a place holder to show you how it is supposed to look. Anyway, on with the post...
Despite a handful of painting experiences, one skill has evaded me: clean paint lines, more particularly, clean stripes. Is there anything more frustrating than peeling off the tape from a big painting project only to realize your paint dripped, or leaked through the tape ? My husband would tell you that the remedy for this is to stop reading Pottery Barn Kids Catalogs, thereby alleviating the need for stripes on your walls.
Six Tips for Clean Paint Lines
1. Use Frog Tape - I believe this bright green painter's tape possesses magical properties. I know not everyone will agree with me. Like gun control and Justin Beiber, Frog Tape is a very polarizing issue. I've heard compelling arguments for and against, but in my personal experience, it was better than the standard issue blue tape for making clean paint lines.
2. Use a laser level when placing your tape - We used this handy little laser level from Home Depot. It has a vacuum that helps it grip the wall and then it projects a pretty red laser line across the wall so that you can line your tape up perfectly straight (also, if you let your significant other buy a toy such as this, he will be more willing to help with the project).
3. Wet Your Frog Tape- after your tape is in place on the wall, run a wet cloth over the tape (this activates the sealing process which helps to prevent paint from running underneath the tape).
4. Paint Your Base Color Twice-I think this is the most important tip, and it's a bit mind boggling, so stay with me here. Let's say your painting a white wall with a grey stripe. Once you've painted your base color of white, that paint has dried, and you've taped off your lines for your grey stripe, paint the striped section white. The reason? When the paint bleeds under the tape -and it will- the bleed will be white on white- so you won't see it. Once the white paint is dry, you can paint inside your tape lines with grey and the grey is less likely to bleed since there is already dry white paint in the spots where it would seep through- make sense? I hope so.
5. Less is More - The more paint on your roller, the more likely it is to run and bleed through your tape lines, so roll it on lightly.
6. Remove Tape With Caution - After you've done all of this meticulous painting and taping, you must overcome the urge to rip the tape off the wall. Pulling quickly might pull some of the new paint right off the wall when you're dealing with stripes. So remove the tape very carefully and slowly pulling downward at an angle.
6. Remove Tape With Caution - After you've done all of this meticulous painting and taping, you must overcome the urge to rip the tape off the wall. Pulling quickly might pull some of the new paint right off the wall when you're dealing with stripes. So remove the tape very carefully and slowly pulling downward at an angle.
And there it is, my vast wealth of knowledge of painting stripes!
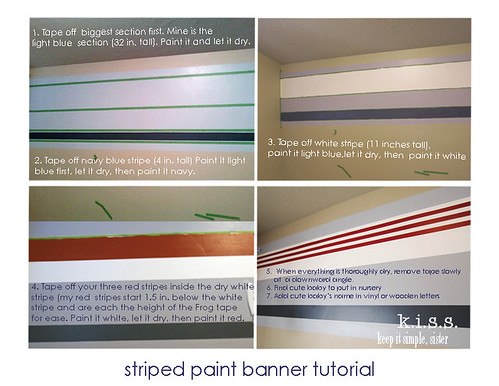
Striped Paint Banner Tutorial
Supply List
4 paint colors (for the small navy and red stripes we just used sample cans from Lowe's)
1 roll of Frog Tape (available at Lowe's)
4 Paint trays
Paint roller with 4 replacement heads
Drop cloth
Tape measure
Laser level
Pencil
I'm linking up to these fabulous blogs:
You (and Kelly) rocked this!! I absolutely love it!
ReplyDeleteThis turned out so cute! I'm featuring you in my Flaunt it Friday Features. Please stop by and grab an "I was featured" button if you like.
ReplyDeleteWow! These stripes look amazing... And you've made it look so easy. :). Now, I think stripes are going to be on the honey-do list for this summer. I posted a printable this past week that might look cute in your nutical nursery: http://sprik.blogspot.com/2011/03/just-because-30.html
ReplyDelete* nautical. :)
ReplyDeleteVery well done! Now I just need to come up with the right colors to use in my sons' room!
ReplyDeleteThis turned out just beautifully! Love it! Fantastic job!!
ReplyDeleteAwesome...I still haven't tackled stripes for the very reason you stated, I'm terrified of seapage and drips! Thanks for your tips and tricks. Your striped banner is unbelievable!
ReplyDeleteSimply amazing!
ReplyDeleteYou are friggin AMAZING!!! Oh my gosh, I can't even DRAW a straight line. This is incredible!!! It seriously looks like something straight out of Pottery Barn Kids. You ROCK, Sist'a!
ReplyDeleteThis is absolutely amazing! I love the stripes!! would love if you ever have a chance to come link up to handmade tuesdays @ ladybug blessings. www.ladybug-blessings.com
ReplyDeleteLove the stripes and a great tutorial! I'm putting it the PoPP Spotlight this weekend! Thanks for sharing with us.
ReplyDeletewow... love this idea! love how it breaks up the wall & ads TON of character! :)
ReplyDeletefound you via tt&j! thanks for sharing! :)
How cute! This totally changed the look and is such an easy thing - great job!
ReplyDeleteI am having an "every crafty blog" linky party and would love for you to come and join!
I never would have thought of painting the base color first but it totally makes sense. Great idea!!! Thanks!!!
ReplyDeleteGreat tips! I've painted my girls room in gingham. I mixed the paint with glaze so it is full strength where the stripes meet and a little sheer in between. We found a trick to make our tape not bleed: paintable caulk. You just wipe your finger along the edge of the tape with a little bit of the caulk (must be the paintable kind)and then paint away. Just pull the tape within 24 hours. Perfect lines every time!
ReplyDeletei love this bedroom isabelle
ReplyDelete