
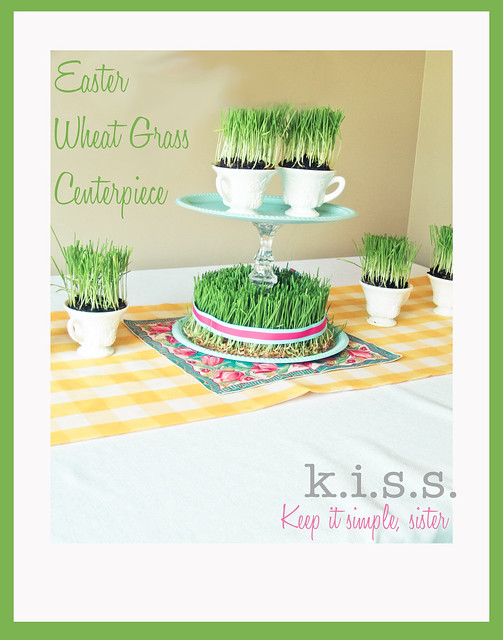
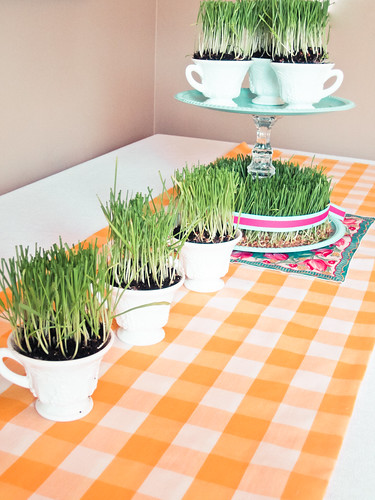
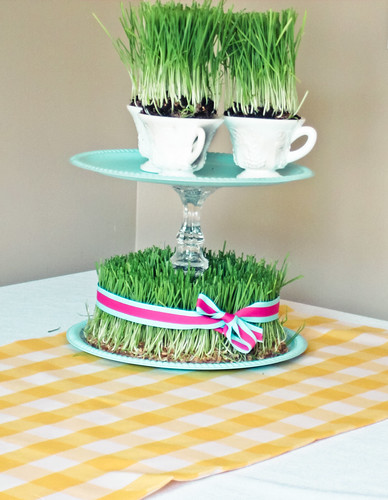
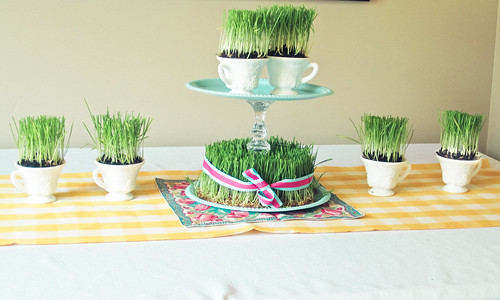
I am rather preoccupied with wheat grass at the moment. While wheat grass centerpieces for Easter are certainly not a new concept, I tried to find a unique way to display this Easter staple. So, using some vintage and vintage-inspired elements, I created this fun wheat grass table scape.
Friends, do not be intimidated at the thought of growing wheat grass. Speaking as a woman who has killed cacti and every other form of plant matter, I must tell you, it is nearly impossible to ruin wheat grass. I've grown it from seed multiple times this Spring. It is cheap, easy fun (you may have all of the supplies already on hand) and what I didn't anticipate is how much four-year-old would love being involved. So let's gather the supplies and the kids and get started!
{It takes about 9-10 days to get your wheat grass to the display stage. If you want to have your centerpiece ready in time for Easter weekend, start the growing process between
April 11 and April 13.}
Easter Wheat Grass Centerpiece Tutorial
April 11 and April 13.}
Easter Wheat Grass Centerpiece Tutorial
Supply List
- Potting soil
- tiny rocks or gravel
- paper towels
- scissors
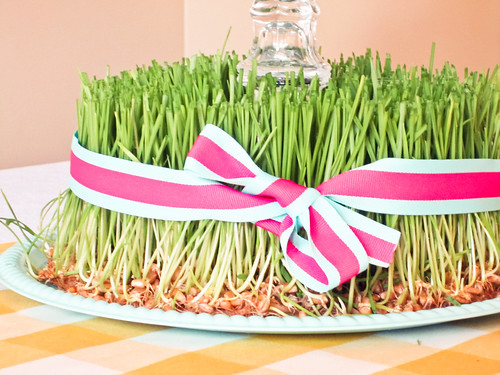
- grosgrain ribbon (my aqua and hot pink ribbon is from Wal-Mart)
- 1 cup of hard red wheat ( available in health food stores for about 95 cents/lb. My 1 lb bag was enough for multiple projects).
UPDATE: Do not use dry-packed wheat from your pantry or food storage. It won't sprout.

- 7-9 tea cups or other fun small containers for planting ( I found my cups at a thrift store for 50 cents each. Do you love them?! I do!)

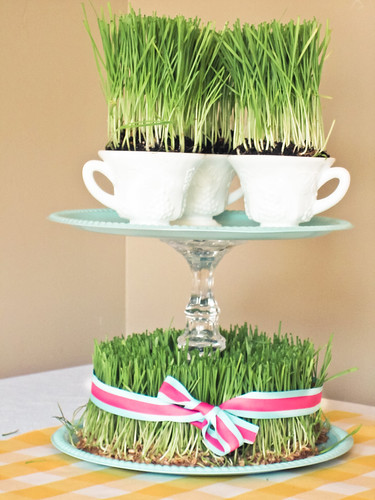
- A fabulously spray-painted Blue Ocean Breeze vintage-inspired dollar store dessert stand (read here how to make it) or use your own cake/dessert stand to display the grass.

For this project, I grew wheat grass in soil and on a paper towel. Did you know you can grow it on just paper towels? Neither did I until I started experimenting. I love the paper towel method because you don't have the mess of soil and it gives you so many unique options for displaying it. For this project, start both your soil-grown and paper towel-grown seeds on the same day.
Growing Wheat Grass in Soil
Kids can complete most of these steps with your supervision and they love this project because the grass grows so quickly, it actually holds their interest.
1. Soak 1/2 cup of seeds in water for 24 hours (you can leave it for up to 48 hours if you tend to get distracted like me, and still plant it).

2. Put some gravel or very small rocks in the bottom of your container for drainage (I tried skipping this step once and my grass roots got moldy)

3. Fill it with soil, leaving about 1/2 inch of space at the top of the container and add a little water ( if your kids are doing this part, they may need a little help measuring, as you'll see below ;)

4. Spread your seeds on top of the soil. You want your grass to be dense, so the whole surface of your soil should be covered with seeds, but they shouldn't piled on top of each other. You may have left over seeds depending on the size of your planters.

5. Cover the seeds with a very thin layer of soil- just enough so they aren't exposed.
6. Water twice a day.
7. Within about 48 hours, you should see little green sprouts- very exciting!
8. Transfer your planters to a sunny spot (near a window) and keep the soil moist. Watering 1/4 cup per planter, twice a day, worked well for me.
9. By day 10 you should have a very healthy crop of grass

(this photo is of grass on day 12- very long)
10. Give it a hair cut (my daughter loved this part) and show it off.

Growing Wheat Grass on Paper Towels
Again, get the kids involved in this!
1. Soak your seeds (1/2 cup) in water for 24 hours
2. Stack 3-4 thick, absorbent paper towels on top of each other and cut in a circcular shape that will fit on your display plate.

3. I used a cup to trace and cut a circle in the center of mine to accommodate the center column in the desert stand display.

4. At this point, I would recommend transferring your paper towels to a regular plate that is easily movable and washable. You can transfer the grass to the display stand once it has grown.
5. Wet the paper towels
6. Spread the seeds on top of the paper towels. You want your grass to be dense, so the whole surface of your paper towel should be covered with seeds, but they shouldn't pile on top of each other.

7. Cover the seeds with 2-3 more wet paper towels
8. Wet the paper towels several times (4-5) a day for the next two days. Do not let your paper towels get dry, they should be thoroughly wet, but not so wet that there is excess water on the plate (drain the plate if you have excess water).
9. When you see tiny white little sprouts, transfer your plate to a sunny place, but keep them under wet paper towels.
10. Within 1-2 more days, you should see little green sprouts-hooray!
11. Once you see green, remove the top paper towels, but continue to keep the grass wet, watering 1-2 times a day.
12. When you start to see the little white roots poking through the bottom of the paper towels, you can cut an opening in the paper towel ring open, cutting any roots in your way. Do this so you can slide the grass ring around the pillar on your display tray.


.

( I put the baby bottle in the center of mine to prevent the grass roots from covering up the the circular opening in the middle.)
13. By day 10 ( or possibly sooner) you should have a pretty decent crop of grass in need of a hair cut.
When you have a lovely crop of wheat grass with a fresh hair cut, stack your tea cups on the top of your display tray and slide the grass ring around the base tray. Tie a piece of ribbon around the grass if you like.
Enjoy your Easter weekend knowing that you do, in fact, have a bit of a green thumb.
I am linking up to Wow us Wednesday at Savvy Southern Style and these sensational blogs this week, I hope you'll pay them a visit!
this is really cute! I love wheat grass.
ReplyDeletei like your handmade idea - looks really fresh and vibrant - lovely!
DeleteAre you serious!?! I have been looking EVERYWHERE for wheat grass! And I have buckets of wheat in our food storage! *SMACKING FOREHEAD* This is AWESEOME!!!! I am sooo doing this! And I love that you used your centerpiece that you made! This looks fabulous, Tatum!
ReplyDeleteGreat tutorial! I did wheat grass centerpieces for a tea party baby shower I did awhile back. They were a big hit. you can see them at this link if you are interested.
ReplyDeletehttp://remarkable-home.blogspot.com/2011/03/garden-tea-party-baby-shower_1399.html
So cute and cool!
ReplyDeleteThanks for sharing!
This is such a cool idea. I'm putting it on the to-do list. Thanks!
ReplyDeletewhat an awesome idea! perfect for spring!!
ReplyDeleteI'd love for you to link this up to my new link party, Your Whims Wednesday! http://mygirlishwhims.blogspot.com/2011/04/your-whims-wednesday-1.html
Good grief, girl, you are so smart and talented! What a fun project, and I'm sure P loved it too. LOVE how the cake stand turned out, too!
ReplyDeleteI absolutely LOVE this post!! I have a cake stand that just sits empty....I can't wait to do this for Easter!!
ReplyDeleteAlso, would you be interested in doing a guest post for me?? That way I could feature multiple projects of yours??
Thanks for linking! :)
I love what you did! It's perfect for spring or easter. I think this piece can also be done with kids.
ReplyDeleteI discovered your blog from Savvy Southern Style. I hope we could develop a connection by following each others blogs.
Have a great day!
That looks great and very springy!! Would love if you stop by my blog!! Have a great day!
ReplyDeleteso going to have to try this! love it!!!! xoox tracie
ReplyDeletethis is super interesting....i thought you went out and bought the grass! so cute...going to try it. even though i generally kill plants. ha.
ReplyDelete12 days to wheat grass this is amazing and we are sooooo doing this next year. Thanks for the inspiration!
ReplyDeletethis is both fun and elegant...and yes, you have become a wheat grass geek...would love for you to share this tute at fridays unfolded @ http://www.stuff-and-nonsense.net/2011/04/fridays-unfolded-13.html
ReplyDeleteblessings,
alison
stuff and nonsense
I do love wheat grass! Never tried to grow my own before, but I will definitely try this! My granddaughter will have as much fun with it as I do!
ReplyDeleteBig TX Hugs,
Stephanie
Angelic Accents
this is so cute! I love wheat grass! and didn't know about the papertowel trick! Thanks! I am your newest follower.
ReplyDeleteThis is adorable! I am going to try this with the grandkids. Thanks.
ReplyDeleteoh my goodness- this just made my day! I've been asking around all week if anyone has grown wheatgrass....and the reviews online made it sound hard. so this is great! THANK YOU! Seriously :)
ReplyDeleteI have always wanted to try to grow grass for a centerpiece. Thanks for the tutorial! I LOVE the addition of the pink ribbon. So cute!
ReplyDelete(fyi - I'm stumblin' this post to save for later!)
How fun! I love this idea!
ReplyDeleteRachel @ Maybe Matilda
Wow this looks so great! So unique!
ReplyDeleteJo-Anna
Love it! I didn't know you could grow wheat grass on a paper toweling. :~)
ReplyDeleteReally cute centerpiece! Perfect for spring!
ReplyDeletehttp://www.inspired2cook.com/
That's so pretty!
ReplyDeleteHow cute! I have tons of red wheat! I am going to do this!
ReplyDeleteHoly smokes what an amazing tutorial! Who knew you could grow anything on a paper towel? LOL. I need some of this in my house like yesterday. Even though it's sunny and warm, our back yard is all stamped concrete and I don't have any grass =( I'm dying for all the shrubs to come into bloom so there is something green to look at back there. I would love to have you share this at my VIP party this weekend =) http://designergarden.blogspot.com/2011/04/vip-party-10.html
ReplyDeleteI am your newest follower! That centerpiece is awesome! I came over from Tatertots and Jello!
ReplyDeletehttp://lookmanohands-robinson.blogspot.com
I LOVELOVELOVE this!!!!!!!!! I am going to have to see if I can find some seeds. I totally have those tea cups too, so all I have to do is make a tiered stand.
ReplyDeleteThis is such a creative idea, thanks for linking up!
ReplyDeletelove this! I've got some things I want to put wheat grass in, but I didn't know how to do it.
ReplyDeleteLOVE your blog AND your creativity!!! Those cups are by the Indiana milkglass company and you Stole them at 50 cents each...they are worth about $10-$20 a set of six!!! Looking forward to seeing more of your projects and ideas!
ReplyDeleteAwesome tutorial as usual! I have a black thumb but you have given me hope :) Thanks for sharing, your dessert stand is wonderful too!
ReplyDeleteI love your display! I'm currently on day 7 with my wheat grass. I did have a little molding. :( Leave it to me to mess up a completely easy seed project! But, for the most part, my grass is doing well! I can't wait to see how it fills in! Fingers crossed!
ReplyDeleteThis turned out so cute! I love wheat grass but never considered growing it because I too, am a house plant killer. I might just have to try this.
ReplyDeleteI'm featuring you in my Flaunt it Friday features, stop by and grab an I was featured button if you'd like. Thanks for linking! :)
Love the look and great tutorial. thanks for joining WUW.
ReplyDeleteWhat an awesome idea! These make the cutest Easter decorations - and to think I almost bought fake grass the other day!!
ReplyDeleteThe kids and I just put together our own wheat grass centerpiece. Like a few other readers, I didn't know I could just use my wheat storage. It will be so fun to watch the growth as we approach Easter in just two weeks. I add a blog post in coming weeks. So glad you linked up a party I follow. www.modbefashion.blogspot.com
ReplyDeletesimply fantastic!! *sigh* Such a gorgeous gorgeous idea.. so simple and neat! Loved your dessert table.. amazing!! :-)
ReplyDeleteHope you have a fabulous week ahead!
Amazing! I'm starting these TODAY!
ReplyDeleteI am having a problem finding the type of wheat grass you used in this tutorial where I live and I was wondering if there is any other type of wheat grass to use or if I could just use normal wheat.
ReplyDeleteVERY CREATIVE AND COOL!
ReplyDelete--
Daniela
http://isreview1.blogspot.com
I LOVE this!!!! but I can't find wheat seeds anywhere! Do you know some specific places that have it?
ReplyDeleteI love this. Will definatley try with my son.
ReplyDeleteI just had to tell you- thanks to your tutorial- my wheatgrass is doing very well! I blogged about it today!
ReplyDeletehttp://threeyearsofdeath.blogspot.com/2011/04/go-green.html
This is super cute. Going out to pick up some wheat kernels tomorrow! Thanks for the tutorial!
ReplyDeleteJill of oursevendwarfs.com
This is adorable! I just stumbled upon this post, wish I saw it earlier. Will definitely bookmark for a later use. Thanks for sharing!
ReplyDeleteThat is so pretty! Such a great idea for Easter/Spring! Thanks for the tutorial!
ReplyDeleteWould love for you to join my linky party! http://www.inspiringcreationsblog.com/2011/04/friday-favorites-linky-party_21.html
So fun! I went to the decorating store here in town and they had these all over the store in pots. I was so enthralled by them. :) So, I decided to get some seeds, for $1 and try it out. This is my first time trying this so I hope it works. Thanks for the tutorial. I wasn't quite sure how much I needed to water them. I can't wait to see my grass start to grow! :)
ReplyDeletejustenoughstyle.blogspot.com
LOVED IT! Thanks so much. I did it and blogged about it. I mentioned you and linked back to you! Thanks for the awesome tutorial.
ReplyDeletehttp://abirdandabean.blogspot.com/2011/04/wheatgrass-centerpiece.html
Your centerpieces look so pretty! Thanks so much for the directions on growing wheat grass on a paper towel. I tried it and was amazed with how well it grew!
ReplyDeleteLOVE this! I have so many cups and saucers in little floral motifs that this will look adorable in... Thank so much!
ReplyDeleteNature will come alive on my desk. Honestly, such a fantastic tutorial. BTW: I want to share this photographs on my home decor blog. http://www.vistastores.com/blog/ So, How can I get it done?
ReplyDeleteThanks for sharing! I think wheat grass is amazing. It's such a good healthy food source.
ReplyDeleteI'm pretty sure that these flowers are natural. I'd love to have them in my room as well. Anyway, can I also put this outside? I think it would match along with my Where to Buy Artificial Grass at the backyard.
ReplyDeleteThanks so much - have wanted to do this but had NO idea how long it would take the grass to grow, so I could do it in time for an Easter centerpiece - am going to do it w/ my 4 yo grandson too!
ReplyDeleteThanks fore the tutorial. My question is the shape I am using is more like the tea cup, so do I need to use soil for that shape? Also, why don't the roots get moldy on the plate without the rocks? I am using bowls, and was thinking of putting rocks in the bottom followed by some paper towels. Would that work? Thanks.
ReplyDeleteเครดิตฟรี 50 2022 เครดิตฟรี 50 2022 โปร สล็อตโจ๊กเกอร์ เครดิตฟรี 50 ทำยอดตามกำหนด ถอนขั้นต่ำ 100 บาท
ReplyDeleteVery useful article information on Artificial Grass. Thanks for sharing. From Artificial Grass Manufacturer
ReplyDeleteArtificial Grass Service Manufacturer